There are so many baking hacks and tips that I have learned the hard way over the years, but here are 5 of the ones that I think will be quite helpful for you especially heading into the holiday baking season. (
above background photo by Brooke Lark on Unsplash)
Obviously, many baking tips are specific to the particular item you are baking - muffins, yeast bread, quick bread, pies, cakes, quiche, cookies, brownies, rolls, etc. Perhaps we'll create a series of posts, highlighting tips for each type of item in the coming months - would you like that?
For now, let's get started on the ones you can use right away.
Proofing Yeast
This is one of those lessons learned the hard way. When using yeast, and mixing it into your dough, how do you know that it's still good (or that you didn't kill it by using water that is too hot) until the final rising and baking of your bread or rolls?!? Well, actually, you can know ahead of time (avoiding the pitfall of the flat heavy loaf of bread that's not really quite edible).
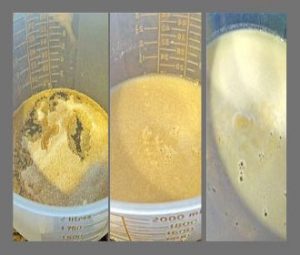
When using yeast and mixing it with water, be sure to use warm water (and NOT hot water - water that is too hot will actually kill the yeast).
Next, once you've mixed the yeast with the warm water, sprinkle a little bit of sugar over the top and let it sit for 3 to 5 minutes. If the yeast is active and still good, you'll start to see little "blooms" of mushroom shaped clouds begin to surface across the top of the water. This means your yeast is active and will properly leaven your dough - yay!
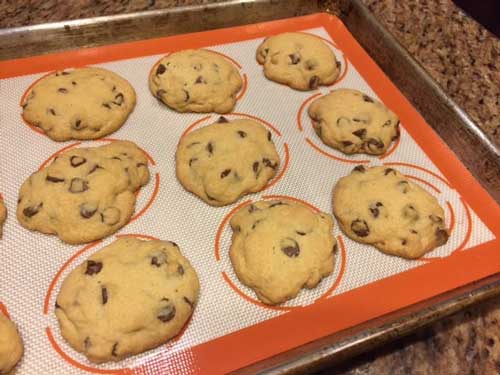
Silicone Baking Mats
I only discovered the wonderful benefits of using these baking mats a few years ago. Many recipes will give instructions for lining a baking sheet with parchment paper before baking or spraying the sheet with cooking oil to prevent items from sticking to it.
However, the
baking mats work wonderfully and are environmentally-friendly (no throwing away a sheet of parchment paper for every batch) and healthier (no added oil soaked up by your baked goods from the spray).

I love that they are easy to wash - simply wipe off with warm water and dish soap, dry, and then roll up or lay flat to store until next time. The best part? Your baking sheet is clean - just put it away (no scraping, scouring, soaking needed)! Who doesn't love that?
Use Crisco for Shortening
I don't generally consider myself a brand snob for most things. I'm usually quite happy to pick up the store brand or an off-brand when it's less expensive or on sale. However, I have learned this lesson through trial and error as well. When your recipe calls for shortening, please - for heaven's sake - use Crisco brand.
It always makes the pie crust flakier, the baked goods lighter, and doesn't leave a dreadful shortening after-taste in any of those wonderful freshly baked items.
I know lots of people prefer using butter to make pie crusts, but I love the fail-safe Crisco approach where I don't have to worry about the exact temperature or texture of the shaved or sliced butter pieces when working with the dough. (
Here's my go-to pie crust recipe).
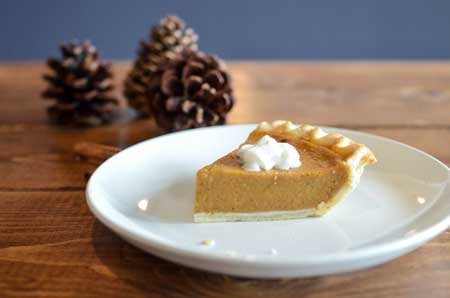
Protect Pie Crust
You know when you're baking a pumpkin pie or any single-crust pie, and the crust edges start to get too brown but the pie filling needs longer to bake? What is a baker to do?
Grab some aluminum foil, tear it into strips about 2-3 inches wide, and carefully crease those strips around pie crust edges, covering them to protect them from the worst of the heat while your pie filling finishes baking.
Other than being a bit tricky at first, to figure out placing them well without burning your fingers in the process - it's a very effective hack, keeping your pie crust looking amazing every time. (
Photo by Element5 Digital from Pexels)

If you prefer, you could purchase a
pie crust shield (affiliate link) to set over the pie crust edges when needed (saving you the hassle and trash of the aluminum foil). Besides, they make you look like such a professional - when you pull those out of your baking drawer.
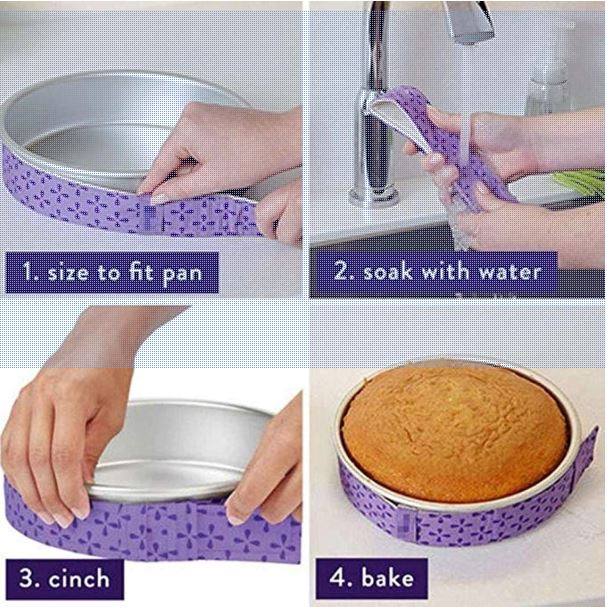
Cake Side Protectors
All right, last tip for today. I only recently discovered this baking tool at a friend's house - and couldn't believe I had never come across it before.
These
fabric cake strips (affiliate link) are used to wrap around the sides of your cake pans and prevent the edges from browning so much faster than the middle of your cake. You have experienced that before, right? By the time the center of the cake is baked through, the side edges have become so brown, they look a bit overdone.
By soaking these cloth rings in cold water, wringing them out, then wrapping them around the edges of the cake pan, the cooler temperature and water keep the outside edges from getting hot as fast, thereby preventing overdone edges of your cake as well as keeping the center from crowning or splitting. Voila! (
below image from Amazon)
I love learning new things and stumbling across ways to make every-day kitchen tasks a little bit easier. Do you have some baking hacks to share or lessons you learned the hard way in the kitchen? We look forward to seeing your comments below or reach out to us any time with your questions. We love to help!
Remember you and your family and friends can keep all your favorite baking recipes here in your digital recipe box on Dish Dish with your own free account. What are you waiting for?

 When using yeast and mixing it with water, be sure to use warm water (and NOT hot water - water that is too hot will actually kill the yeast).
Next, once you've mixed the yeast with the warm water, sprinkle a little bit of sugar over the top and let it sit for 3 to 5 minutes. If the yeast is active and still good, you'll start to see little "blooms" of mushroom shaped clouds begin to surface across the top of the water. This means your yeast is active and will properly leaven your dough - yay!
Silicone Baking Mats
I only discovered the wonderful benefits of using these baking mats a few years ago. Many recipes will give instructions for lining a baking sheet with parchment paper before baking or spraying the sheet with cooking oil to prevent items from sticking to it.
However, the baking mats work wonderfully and are environmentally-friendly (no throwing away a sheet of parchment paper for every batch) and healthier (no added oil soaked up by your baked goods from the spray).
When using yeast and mixing it with water, be sure to use warm water (and NOT hot water - water that is too hot will actually kill the yeast).
Next, once you've mixed the yeast with the warm water, sprinkle a little bit of sugar over the top and let it sit for 3 to 5 minutes. If the yeast is active and still good, you'll start to see little "blooms" of mushroom shaped clouds begin to surface across the top of the water. This means your yeast is active and will properly leaven your dough - yay!
Silicone Baking Mats
I only discovered the wonderful benefits of using these baking mats a few years ago. Many recipes will give instructions for lining a baking sheet with parchment paper before baking or spraying the sheet with cooking oil to prevent items from sticking to it.
However, the baking mats work wonderfully and are environmentally-friendly (no throwing away a sheet of parchment paper for every batch) and healthier (no added oil soaked up by your baked goods from the spray).
 I love that they are easy to wash - simply wipe off with warm water and dish soap, dry, and then roll up or lay flat to store until next time. The best part? Your baking sheet is clean - just put it away (no scraping, scouring, soaking needed)! Who doesn't love that?
Use Crisco for Shortening
I don't generally consider myself a brand snob for most things. I'm usually quite happy to pick up the store brand or an off-brand when it's less expensive or on sale. However, I have learned this lesson through trial and error as well. When your recipe calls for shortening, please - for heaven's sake - use Crisco brand.
It always makes the pie crust flakier, the baked goods lighter, and doesn't leave a dreadful shortening after-taste in any of those wonderful freshly baked items.
I know lots of people prefer using butter to make pie crusts, but I love the fail-safe Crisco approach where I don't have to worry about the exact temperature or texture of the shaved or sliced butter pieces when working with the dough. (Here's my go-to pie crust recipe).
Protect Pie Crust
You know when you're baking a pumpkin pie or any single-crust pie, and the crust edges start to get too brown but the pie filling needs longer to bake? What is a baker to do?
Grab some aluminum foil, tear it into strips about 2-3 inches wide, and carefully crease those strips around pie crust edges, covering them to protect them from the worst of the heat while your pie filling finishes baking.
Other than being a bit tricky at first, to figure out placing them well without burning your fingers in the process - it's a very effective hack, keeping your pie crust looking amazing every time. (Photo by Element5 Digital from Pexels)
I love that they are easy to wash - simply wipe off with warm water and dish soap, dry, and then roll up or lay flat to store until next time. The best part? Your baking sheet is clean - just put it away (no scraping, scouring, soaking needed)! Who doesn't love that?
Use Crisco for Shortening
I don't generally consider myself a brand snob for most things. I'm usually quite happy to pick up the store brand or an off-brand when it's less expensive or on sale. However, I have learned this lesson through trial and error as well. When your recipe calls for shortening, please - for heaven's sake - use Crisco brand.
It always makes the pie crust flakier, the baked goods lighter, and doesn't leave a dreadful shortening after-taste in any of those wonderful freshly baked items.
I know lots of people prefer using butter to make pie crusts, but I love the fail-safe Crisco approach where I don't have to worry about the exact temperature or texture of the shaved or sliced butter pieces when working with the dough. (Here's my go-to pie crust recipe).
Protect Pie Crust
You know when you're baking a pumpkin pie or any single-crust pie, and the crust edges start to get too brown but the pie filling needs longer to bake? What is a baker to do?
Grab some aluminum foil, tear it into strips about 2-3 inches wide, and carefully crease those strips around pie crust edges, covering them to protect them from the worst of the heat while your pie filling finishes baking.
Other than being a bit tricky at first, to figure out placing them well without burning your fingers in the process - it's a very effective hack, keeping your pie crust looking amazing every time. (Photo by Element5 Digital from Pexels)
 If you prefer, you could purchase a pie crust shield (affiliate link) to set over the pie crust edges when needed (saving you the hassle and trash of the aluminum foil). Besides, they make you look like such a professional - when you pull those out of your baking drawer.
Cake Side Protectors
All right, last tip for today. I only recently discovered this baking tool at a friend's house - and couldn't believe I had never come across it before.
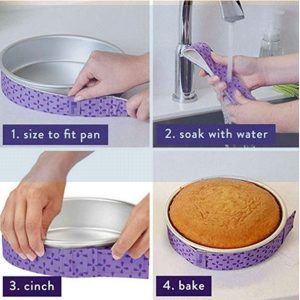
These fabric cake strips (affiliate link) are used to wrap around the sides of your cake pans and prevent the edges from browning so much faster than the middle of your cake. You have experienced that before, right? By the time the center of the cake is baked through, the side edges have become so brown, they look a bit overdone.
By soaking these cloth rings in cold water, wringing them out, then wrapping them around the edges of the cake pan, the cooler temperature and water keep the outside edges from getting hot as fast, thereby preventing overdone edges of your cake as well as keeping the center from crowning or splitting. Voila! (below image from Amazon)
If you prefer, you could purchase a pie crust shield (affiliate link) to set over the pie crust edges when needed (saving you the hassle and trash of the aluminum foil). Besides, they make you look like such a professional - when you pull those out of your baking drawer.
Cake Side Protectors
All right, last tip for today. I only recently discovered this baking tool at a friend's house - and couldn't believe I had never come across it before.
These fabric cake strips (affiliate link) are used to wrap around the sides of your cake pans and prevent the edges from browning so much faster than the middle of your cake. You have experienced that before, right? By the time the center of the cake is baked through, the side edges have become so brown, they look a bit overdone.
By soaking these cloth rings in cold water, wringing them out, then wrapping them around the edges of the cake pan, the cooler temperature and water keep the outside edges from getting hot as fast, thereby preventing overdone edges of your cake as well as keeping the center from crowning or splitting. Voila! (below image from Amazon)
 I love learning new things and stumbling across ways to make every-day kitchen tasks a little bit easier. Do you have some baking hacks to share or lessons you learned the hard way in the kitchen? We look forward to seeing your comments below or reach out to us any time with your questions. We love to help!
Remember you and your family and friends can keep all your favorite baking recipes here in your digital recipe box on Dish Dish with your own free account. What are you waiting for?
I love learning new things and stumbling across ways to make every-day kitchen tasks a little bit easier. Do you have some baking hacks to share or lessons you learned the hard way in the kitchen? We look forward to seeing your comments below or reach out to us any time with your questions. We love to help!
Remember you and your family and friends can keep all your favorite baking recipes here in your digital recipe box on Dish Dish with your own free account. What are you waiting for?


Comments